Tuesday, May 12, 2009

Raising Day!!

Raising Day was an enormous success! Great weather, timbers, food, and drink. Everything went really, really well.

Pictures will tell the story better than words will:


Monday, May 11, 2009

Moving the finished timbers to the job site!

The frame is 100% finished!

The timber frame is complete, chamfered, sanded, organized and stacked in the workshop. We decided to move the timbers to the job site the day before the raising to minimize the timber's exposure to the elements prior to raising the frame.


We fit the whole frame onto my 5'x14' trailer. The weight of the frame was almost more than my poor battered utility trailer could withstand. It was very cool seeing a nice, complete, stacked set of timbers on the trailer...ready for transport to the site.


Me above the frame:


And Peter:


I could not quite get the frame to the job site up the steep and damp hill in one load. It was quite a bit of work to move the timbers into place.

Once the timbers were stacked and organized on site, we finished placing the cedar floor joists and cutting and securing the subfloor on the deck.


Meanwhile, Lisa applied a coat of LandArk penetrating oil to the joinery and endgrain of the timbers:


When everything was in place and ready for the frame raising, we placed a massive blue tarp over the whole thing to keep the timbers protected from direct sun and rain.


Everything is in place for raising day. Now, its just a matter of getting the tools on site and having fun on raising day!

Sunday, May 3, 2009

Brace curves are cut!

Earlier in the year, we bartered some elm and cherry for access to Chris Caudill's deluxe bandsaw. Chris is a local amateur woodworker, and we appreciate his help.

We used his bandsaw to cut curves into all of the knee braces. They turned out great!


Its good to see the knee braces completely finished. The lighter colored braces came from an elm tree that grew at PCEI. The darker braces came from elm in East City Park. All of these elm died from disease.

They will look stunning and live on in the PCEI Artists' studio!

Preparing the floor system

In preparation for the frame raising, we decided to focus on finishing the floor system for the studio. The first step was to brush and paint the foundation steel. It turned out looking great. Two coats of Rustoleum should help preserve this metal, even though it will not be directly exposed to the elements.


I used a natural tone stain on the sill plate timbers. These timbers will bare the brunt of exposure to the elements, mainly water. We decided to really coat these timbers with a liberal amount of protecting stain in an effort to preserve them better. These timbers will need periodic maintenance over the years.

The stain darkened the wood somewhat, but they look very good. We decided to leave the sill plate timbers rough-cut (not planed and sanded). The salvaged piece of Douglas Fir turned out looking very rich and dark.


After setting the timbers onto the piers, we found that the sill plates were essentially perfectly square! I guess it really pays to test fit in the workshop!


We drilled holes through the timbers and through the metal. Into these holes we placed 1/2" anchor bolts. The J portion of the anchor bolts rests on top, and we chiseled a small groove to recess the top end of the J-bolt. This allows us to tighten the nut on the bottom.

Here is Peter drilling holes in the timber.
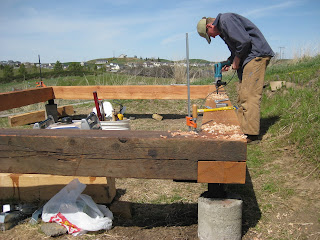


The sill plates look pretty good once they are all put together:


We hung 2x8 cedar floor joists between the larger sill plate timbers. We used cedar due to city code: all floor joists on a pier foundation must be at least 18" from grade...unless you use treated joist lumber or naturally rot-resistant joist lumber (then they have to be at least 12" from grade).

The city ran the span numbers and found that Western Red Cedar would work on this span, assuming we used a 3/4" plywood subfloor. We went that route.


The joists were hung in such a way that the plywood will sit perfectly flush with the tops of the sill plate timbers. We need to special order an additional 2 cedar 2x8 joists to finish the floor system, which will happen prior to raising day!


Less than 5 days until raising day. I think we're going to make it!

Saturday, May 2, 2009

The roof system is nearly complete

Peter and I mocked up the roof system for the studio inside of my workshop. We started by arranging the large top plates correctly with respect to spacing and height. We then laid out all of the rafters on top of the massive plates to mark precisely where to cut out bird's mouths.

We cut all of the bird's mouths and laid the rafters on top of the plates to get a feel for how things will basically look:


We left ourselves 1/4" of slop on the eave end since we don't know *exactly* how everything will sit on raising day. This extra 1/4" gives us the opportunity to make precise adjustments on raising day to get a perfect fit for our bird's mouths.


One thing became apparent to me. While this building has a tiny footprint, its roof area is fairly large due to the large overhangs on both the eaves and gable ends (especially the south gable end).


In a very non-traditional yet pragmatic move, we opted to use large lag bolts to secure the rafters to the top plates. I found some great 3/8" x 10" lag bolts that should do the trick.


Less than one week until raising day! We still have a ton of work to do to prepare, but we're definitely looking forward to it.