Tuesday, December 16, 2008

Chainsaw milling the curved beam...

After we deposited the huge American Elm (Ulmus americana) at the PCEI Nature Center, we got to work cutting it into a manageable size. Peter used a chainsaw and cut some irregular chunks off the larger diameter end to make the log more cylindrical. This made the log easier to rotate and apply a chainsaw mill.


We spent some quality time determining the optimal depths and orientation to cut our slabs. We opted to cut ~9" slabs on either side of the pith.


We borrowed a Sperber chainsaw mill from local timber framer Nils Peterson. To guide the chainsaw mill's first cut, we placed an extension ladder on top of the log. The rollers on the chainsaw mill slide across the smooth surface of the chainsaw mill. We placed spacers under the extension ladder to compensate for the taper in the log and keep the cut relatively level with the height of the pith.


Each pass of the chainsaw mill takes about 20-30 minutes. It is definitely slow going, but sometimes a chainsaw mill is the only way to cut massive, inconvenient, remote, or curved timbers. (Thanks Nils!)


After cutting our slabs, we found that there were two veins of rotting wood inside the tree. These defects were located on opposite sides of the slab, and will make laying out and carving the curved beam more difficult and perhaps impossible.

We left discouraged, but not defeated.

Days later, Jacob Dolence, an Americorp volunteer from PCEI's Environmental Education program, helped me mill the second 9" slab from the log using the chainsaw mill.

I moved the more defective slab to my mill, and the least defective slab to my workshop.

Time to layout and perhaps carve the slab into the curved beam that we want. My fingers are crossed!

Monday, December 15, 2008

East City Park Elm

Sadly, many American Elm trees around Moscow are infected with Dutch Elm disease.

We arranged with Roger Blanchard, The Moscow city arborist, to take all of the usable wood from a century-old American Elm tree. This tree was first girdled, and then felled, because it was found to be infected with Dutch Elm disease. The tree was felled by Lacey K tree service. We agreed to move the wood outside of Moscow and/or to remove all of the bark to kill the beetle larvae which carries Dutch Elm disease.


The butt end of the tree was massive, and we estimated its weight at close to 8,000 lbs. Far too large for my trailer, we borrowed the 5,000-lbs capacity trailer from PCEI. We hired a hydraulic self-loading rock-moving truck to lift the log onto the trailer. The weight of the log was enough to lift the back of the trailer and the back of my Jeep completely off the ground as it was being loaded.

The log and the weight were clearly too much to safely transport to my sawmill. Instead, we moved the log to the nearby PCEI campus. It took three 4x4 trucks to pull the log off of the trailer and onto the ground:


The hope is to mill and chainsaw carve this giant log into the special curved timber on the front of the PCEI Artist's studio...

Milling, Milling, Milling...

This late fall, Peter and I have been hard at work milling the timbers for the studio. We wanted to mill everything before snow prevented easy access to the mill site.

This work is moderately rewarding: It takes a long time to move logs onto the mill and into the correct position. However, the payoff happens when one gets to open up a log and look inside for the first time. Even after milling dozen of timbers, I get a kick out of seeing a near-perfectly square timber take shape out of a curved, knobby, muddy, bark-covered log. The better the wood quality, the more fun it is. Large, clear, straight logs with no obvious pitch pockets are the best. As far as preferred species, Western Larch and American Elm are particularly rewarding, as well as the rare high-quality Douglas Fir log. Clear Ponderosa and Lodgepole Pine is nice too. Heck, its all good.

Lacking large machinery for moving logs around we often have to rely on levers and cant hooks (aka peaveys) to move logs into position. Here is Peter, standing atop our log deck, rolling a large log off the deck all the way down to the sawmill:


Peter is more cavalier about standing on top of an unstable log deck than I am. :-)


Rolling a log up onto the mill can be challenging. I bought optional spring-loaded ramps which make this a lot easier. The log "rachets" up the ramps. Even working alone, I can move a very heavy log into position on the mill with the aid of a cant hook.


Here, Peter is operating the sawmill, finishing the top cut which will finalize this large timber. Each ripping cut takes a matter of seconds. Most sawing time is spent setting up cuts to make things square. Carefully planning out how to get the most out of each log and then moving things carefully into position really pays off and reduces waste.


The sawmill sounds like a large, loud lawn mower engine. Hearing protection is a great idea.


Here, you can see the back of the bandsaw blade as it makes a cut into the log.


The bandsaw is lubricated with water. You can see that here:


Here I am, finishing a cut on a massive Ponderosa Pine log.


This pine log turned into a huge 13"x14" timber. It had enough defects (knots) to prevent its use as a beam, although it might make an excellent post or it could be cut into 1"x12" boards and used as board and batten siding. A lot of barns around the Palouse use pine board and batten siding. I've seen original, 100 year old pine siding in good shape on some of these barns.


Below, I am milling a large dead-standing Western Larch log. This timber will be one of the three large top plates on the studio. It will be partially responsible for supporting the weight of the heavy living roof. I've always found that Larch seems to check more severely than most other native softwoods. The fact that it was harvested as dead-standing means that it is drier and more stable (i.e. seasoned) than most of our other green logs. It is critical that top plates don't warp too much.


We've finished almost all of the milling for this project, although finding/carving the large curved beam on the front of the studio is proving challenging...

Wednesday, November 5, 2008

Logs Delivered to the Mill...

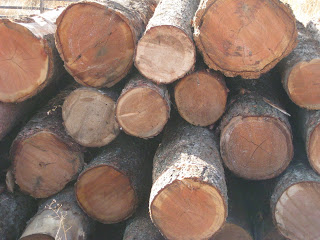
Ideally, we wanted to build this Artist's Studio exclusively using logs donated by community members who had trees that died from disease, wind storms, etc. Many of the studio's posts and beams will come from logs exactly like this. This kind of wood connects the community to the building and each piece of wood in the timber frame tells a story and expresses a sense of place.

However, we realized that we needed additional logs for this project if we intended to finish the frame by the Spring. We bought one truckload of regionally harvested logs from a local, independent logging trucker.


Joe Murray from Potlatch delivered a load of logs to our mill with very little effort, using his self-loading logging truck.


Most of the logs are green Douglas Fir and Western Larch. There is some pine and grand fir thrown in as well. Peter and I hand-picked several of the Larch and Fir logs with certain beams in mind. I had Joe drop these hand-picked logs closest to the Woodmizer.


After having spent some considerable time wrestling logs with come-alongs and winches and peaveys, it was eye opening to watch Joe effortlessly and quickly pick up and move heavy logs as though they were nearly weightless sticks.


The final log deck is over 3,000 board feet of good quality sawlogs.


Most of the logs are 16', but some are closer to 31' in length.


We'll begin milling these gorgeous logs into posts and beams in earnest before conditions prevent good access to the mill.

Winterizing the Job Site!

I rented the Dingo again and moved dirt around to prep the job site for the Palouse wet season. This process involved pushing soil downhill to form a natural grade that fits the hillside. The goal is to allow water to flow naturally downhill without collecting around the foundation. After moving dirt en masse wirth the Dingo, I raked and raked to smooth out the ground.

I think it turned out pretty well.


Tracy Brown from the Watersheds Program seeded the jobsite with grasses and other natural flora. This helps suppress both soil erosion and the inevitable weeds that crop up whenever soil is disturbed.


Tom Lamar then spread straw around the job site to further protect the soil from erosion. This also helps keep birds from eating all of the newly spread grass seed...


Tom also placed buckets with stones over each pier to protect the exposed angle iron from direct moisture until the building itself serves this function.
Not sure what the upended picnic table is all about, but I suppose one could picnic up there in the snow... :-)

Yay! The job site is now prepared for the inevitably wet winter and spring.

On to milling and then finally to timber framing!

Saturday, October 18, 2008

Before pouring concrete, we needed to clean out the holes. The base of many of the foundation holes needed to be shifted at least an inch or two. This was hard work, since it was 90 degrees outside, we had to break through more of that Palouse clay with our shovels, and the holes were not quite wide enough to lean down to remove dirt.

We did find about a dozen of these beautiful salamanders trapped at the bottoms of our holes after only one night. The must have fallen in accidentally and were unable to climb back out. Here you can see me holding one of the little guys...


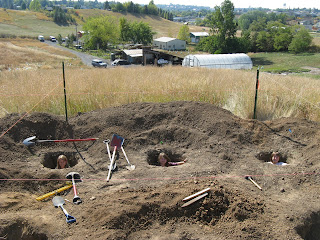
The children loved the holes, too. We made sure to remove them before pouring concrete... :-)


We added 6" of compacted 3/4 minus gravel to the bottom of each hole.

After measuring and re-measuring and re-measuring, we positioned the footers and sonotubes in their correct relative position and then we backfilled our holes. Of course it felt a little frustrating to fill in the holes that we painstakingly cleared out...


The concrete is reinforced with rebar. We have a grid of rebar inside of the bigfoot footers, raised above the gravel layer by pieces of brick. We have 4 pieces of vertical rebar lashed to a brick and to each other with wire.

Peter developed a simple way of building the rebar mesh using a brick and some wire:


Peter and I mixed 30 bags of concrete with water by hand using a tarp. You place an 80-lbs bag of pre-mix concrete on the tarp, add water, and jostle back and forth like a mixer. When the concrete is mixed in the tarp, then you use the tarp to pour the wet concrete into the sonotubes.


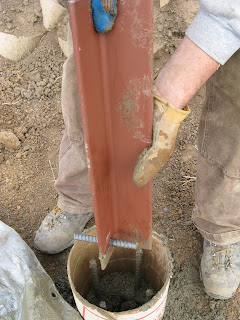
Before pouring all of the concrete, we positioned our angle-iron into the sonotube. The angle iron has a piece of rebar sticking through its base, which will serve as an anchor, helping to resist uplift of the angle iron out of the concrete.


Ultimately, we will weld a custom horizontal plate to this angle iron. This custom plate will attach to the timber sill plate of the artist's studio.


We used some hand-made forms to hold the angle iron in place while the concrete dries. Here, you can see all six finished piers starting to dry.


The pier foundation turned out great!

I think both Peter and I were excited to be done with this phase of the project. Now, we must focus on acquiring logs, milling them, and preparing to cut the joinery this winter.
Since the Dingo was not able to bore through the tough Palouse clay, we rented a Bobcat with a 24" auger bit. The Bobcat weights 4 times more than the Dingo, and this extra weight allowed us to ultimately push through the clay and excavate our holes for our pier foundation.


Our 10x14 footprint is small enough that navigating the Bobcat between the holes was a challenge.


Using the auger on the Bobcat was so simple and easy, that we ultimately dug our holes deeper than 50", when we only needed to go around 30". The extra depth will only serve to make a stronger, more stable foundation.


If you look closely at the following picture, you will see some local wildlife hanging out in the holes.


All six pier holes were close to their ideal location. However, some work was necessary to clean out the holes and make sure we could position our bigfoot footers and sonotubes correctly.

After that, its time to prepare to pour the concrete...

Thursday, September 18, 2008

Excavation Day!

We had a great turnout of volunteers for the Artist Studio excavation project!

Students from both the University of Idaho and Washington State University, PCEI members and staff, and friends and family all turned out to move some dirt. We had about 20 pairs of helpful hands.


A lot of the excavation was done with hand tools: shovels and wheel barrows!


A great day for friends to get together and do some cool work on a hot day!


It was such a hot and dry day that this hastily erected shade shelter turned out to be crucial!


We cut back into the hill. Our deepest dig was 24" below grade. We used GeoWeb material to provide slope stabilization and essentially create a simple earthen retaining wall.


We also used a rented diesel Dingo for our auger and scoop. The dingo was not very helpful unless the ground was softened up with shovels by the volunteers. But once the ground was softened up, the dingo could efficiently push dirt around.


The post holes for the footers and sonotubes turned out to be our only problem. The ground was just too hard.


The hard Palouse clay was a big problem for our little dingo with the 30" auger. Digging with this auger bit was rough going. We ended up largely polishing the clay instead of digging through it.

The next steps are to complete the footer holes using a larger (heavier) machine and a smaller auger bit. After that, we'll setup the footers and sonotubes and rebar and prepare for the concrete pour!!